When setting up email for this site, I followed the Amazon documentation for Exim and it simply did not work. This article describes the few gotchas and how to actually do it.
So, you have created an Amazon EC2 instance in some region, got your domain registered in Route 53, installed Exim (`sudo apt-get install exim4`) and want to be able to send email without them going straight to the spam folders? (Actually, it doesn't have to be EC2 and Route 53, but Amazon has made it easy if you go all in)
Your Route 53 hosted zone for your domain should look something like this:

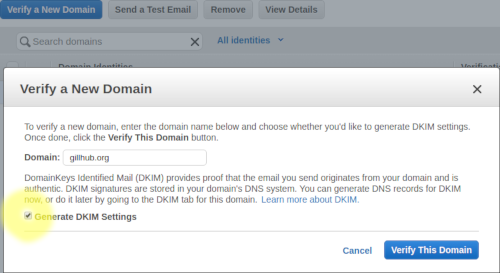
To be allowed to send through Amazon SES you need to verify your domain. Make sure you also generate DKIM Settings.
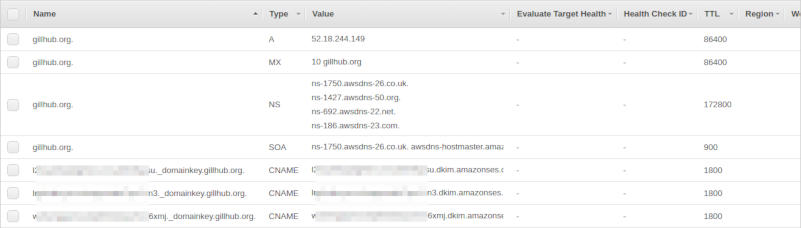
Upload settings to Route 53. Unless you want to make Amazon SES also handle incoming email, go with the default of not uploading the MX record. This is probably a good time to add that MX record manually in Route 53 - I want to handle incoming email myself and added MX "10 gillhub.org". After verifying the domain you should get two emails, one when Amazon has verified the domain and one when Amazon has verified the DKIM settings. After verifying domain and adding the MX record manually the Route 53 hosted zone should look something like this:
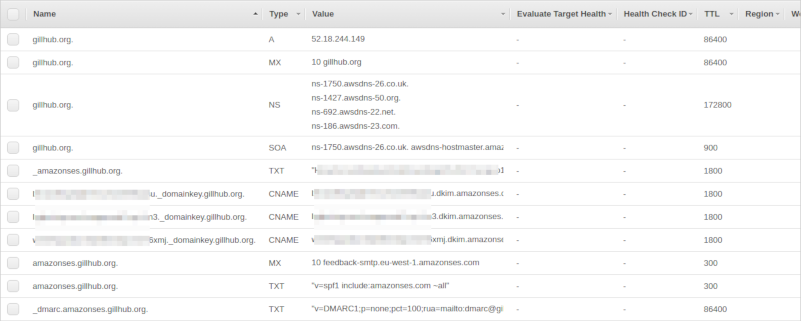
In the Amazon SES verified domain entry, make sure to also set the MAIL FROM domain. This must be a subdomain of your domain (I chose amazonses.gillhub.org). Upload settings to Route 53 (including the MX record). Finally I added a very relaxed DMARC DNS record - a TXT record with name _dmarc.amazonses.gillhub.org and value "v=DMARC1;p=none;pct=100;rua=mailto:
The last thing to do in Amazon SES Console is to go to SMTP Settings (in the Email Sending category), take a note of the server name to use and create a set of credentials. The username you give is not important (you will find it in IAM later), but it is very important to take a note of (or even better: download!) the generated credentials. You will need them for the Exim4 config, and this is the only time it is available. If you lose them, you can create new set of credentials, though.
The Amazon Console part should now be complete. Time to SSH into your instance and set up Exim4.
In your SSH shell:
`sudo dpkg-reconfigure exim4-config`
Type = Sent By Smarthost, Received Via SMTP
Mail Name=What you put in your top-level MX record. gillhub.org for me
IP-address for listeining=blank
Final destinations=Guess it could be blank, but I put in my MX record (gillhub.org) there too
Machines to relay for=blank
Hostname of smarthost=What was listed as servername in SMTP settings, two semicolons and port 587 (for me: email-smtp.eu-west-1.amazonaws.com::587)
Hide Local Mail=yes (will probably work fine with No, too)
Visible Domain=Your MX record (gillhub.org for me)
(Use default values for the rest)
The next step is what caused problems for me. The Amazon SES Documentation for Exim Integration says you should replace Exim LOGIN-handler. Following the documentation result in Exim failing to send email with a "530 Authentication Required". For me, sticking to the preferred Exim4 way of authenticating worked much better:
`sudo nano /etc/exim4/passwd.client` (replace nano with your favourite editor)
Add a line in the given format "server:login:password", where server is "*.amazonaws.com" and login:password is the generated SMTP credentials above.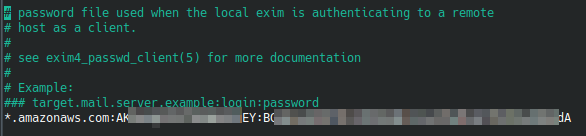
For overriding hostname for MAIL FROM domain, I created the file /etc/exim4/conf.d/main/99_exim4-config_gillhub and set primary_hostname in it:
`sudo nano /etc/exim4/conf.d/main/99_exim4-config_gillhub`
Also, add an alias for the email address given in the _dmarc DNS record. I make dmarc be an alias for admin, but do whatever you want.
`sudo nano /etx/aliases`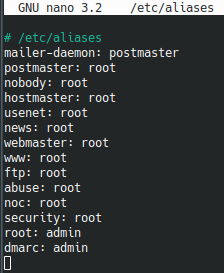
Now it should just be a matter of updating the Exim4 config file..
`sudo update-exim4.conf.template -r`
..and use your favourite way of restarting Exim4
`sudo /etc/init.d/exim4 restart`
To verify that DKIM is working, send yourself an email (obviously replacing my email address with your own!)
`exim -v
(Just type in whatever you want in the mail body, and send it by either having a dot on a line of its own or pressing ctrl+d)
If everything works as expected, you should see Exim handing over the message to Amazon SES, where it will have DKIM headers appended and sent to your email address. There, it should end up in your Inbox and not Spam folder. If you view the mail headers, you should see at least one (most likely two) "DKIM-Signature" headers.