- Category: Security
Even modern versions of C++ makes it trivial to implement exploitable bugs. However, as the test frameworks, compilers, C++ and the standard library have matured, there are no longer any reasons for not making tests to find those bugs (and prevent any future regression bugs while you're at it). If your code is hard to test, it is most likely a sign of bad code structure and architecture, and you will most likely benefit from adapting to something that is more testable.
In this article I will point out how to make your code testable, and how to actually implement unit tests (using GoogleTest), how to make integration tests using stubs or mocks (using gMock, now part of GoogleTest), how to check and visualise code coverage (using lcov) and making it a part of your build pipeline (using GitHub Actions).
Google Test
For only testing small pieces of code, Google Test is a very handy unit test framework. Installing it is just a matter of
`sudo apt-get install libgtest-dev`
using it is just
#include "gtest/gtest.h"
and linking it is just adding to your Makefile LIBSFLAGS
-lgtest
After enabling Google Test you will get access to a few simple macros (TEST, and quite a few EXPECT_*).
If you have a time-class with a constructor that takes a unix time_t as parameter, you could make test named "EpochTest" belonging in a group of tests named "TestDay" like this:
#include "gtest/gtest.h"
TEST(TestDay, EpochTest) {
UTCTime utc_time(0L);
EXPECT_EQ(utc_time.GetYear(), 1970);
EXPECT_EQ(utc_time.GetMonth(), 1);
EXPECT_EQ(utc_time.GetDay(), 1);
}
If you make this into an executable and run it, it will produce output like this:
[==========] Running 1 tests from 1 test suites.
[----------] Global test environment set-up.
[----------] 1 tests from TestDay
[ RUN ] TestDay.EpochTest
[ OK ] TestDay.EpochTest (0 ms)
[----------] 1 tests from TestDay (0 ms total)
[----------] Global test environment tear-down
[==========] 1 tests from 1 test suites ran. (0 ms total)
[ PASSED ] 1 tests.
If any test fail, the executable will return an error code and you can fail your build pipeline.
gMock
If you want to make integration tests for larger parts of your code (instead of only unit testing specific parts of the code) you will most likely want to mock or stub out parts of the code. Stubs are objects made for simply responding in a determined manner, while mocks in addition will record calls and have expectations on how they are called. What you want to mock away is usually network calls, database calls, file handling, authentication and so on.
Unfortunately, there are not many mock frameworks for C++. gMock (now part of Google Test) does the job for simple cases, but is quickly gets complicated if you use references/pointers, classes without copy constructors or the smart pointers from modern C++. It is however much better than nothing. so please try to make use of it. Installing is just a matter of
`sudo apt-get install libgmock-dev`
using it is just
#include "gmock/gmock.h"
and linking it is just adding to your Makefile LIBSFLAGS
-lgmock
A To be able to mock (or stub) out code, you application needs to be able to inject mock (or stub) replacements for that code. Other languages (like Java and C#) are more used to Dependency Injection, but there is no magic to it and no reason for not doing it in C++. Collect database management code (or network, or authentication..) in one class, and instead of using a global singleton or multiple instances of this, make GetDatabaseManager() and SetDatabaseManager() function in your application entry point class. Create a regular instance of your database manager in the application constructor and call SetDatabaseManager() with this instance, and everywhere you have database code, call GetApplication()->GetDatabaseManager() to get hold of it.
Your mock (or stub) database manager should inherit from the regular database manager class, and in the test you will create an instance and call GetApplication()->SetDatabaseManager() to inject your mock (or stub) before calling the code you want to test. Because of how C++ subclassing works, it is important to know that the regular database manager class destructor and all the functions you want to override, needs to be virtual. This will cause a very tiny penalty at regular execution of your application, but well worth it for the cause of testability!
To use some real-world code as example, here is one of my applications using Poco::Net for networking and a gMock class for mocking out the actual network calls. I also include parts of the actual application class and a test. The important parts are shown in red, while the rest may be useful for understanding how the dependency injection works.
Header files (with fancy colours to visualize what goes where in gMock):
class Networking //The actual Networking class
{
public:
virtual ~Networking() = default; //Needs a virtual destructor
public:
[[nodiscard]] virtual std::shared_ptr<Poco::Net::HTTPSClientSession> CreateSession(const Poco::URI& uri) const; //Funtions to mock needs to be virtual
virtual void CallGET(const std::shared_ptr<Poco::Net::HTTPSClientSession>& session, const Poco::URI& uri, const std::string& accept_header) const; //Just an example function. This is how Poco wants a generic REST GET call
};class NetworkingMock : public Networking //A mock class, inheriting from the actual networking class
{
public:
virtual ~NetworkingMock() = default;
public:
MOCK_METHOD(std::shared_ptr<Poco::Net::HTTPSClientSession>, CreateSession, (const Poco::URI& uri), (const));
MOCK_METHOD(void, CallGET, (const std::shared_ptr<Poco::Net::HTTPSClientSession>& session,
const Poco::URI& uri,
const std::string& accept_header), (const));
};class Elspot : public Poco::Util::Application //(The actual application. In this case a Poco application, but it can be whatever)
{
public:
void SetNetworking(std::shared_ptr<Networking> networking) {m_networking = networking;} //Setter function for Dependency Injection
[[nodiscard]] std::shared_ptr<Networking> GetNetworking() const {return m_networking;} //Getter function to be able to pick up injected objects
private:
std::shared_ptr<Networking> m_networking; //The injected object. During tests, this may/will be replaced by a stub or mock object. In this case I've chosen a shared_ptr, but this is all up to you
};[[nodiscard]] Elspot* GetApp(); //Global function to get hold of the main application object. Implement however you like it
and CPP files:
Poco::AutoPtr<Elspot> g_application = nullptr; //The global singleton of your main application object. Could be unique_ptr, old-style pointer etc
void SetApp(const Poco::AutoPtr<Elspot> application) {g_application = application;} //Setter for the global application object. I've named my application Elspot (it fetches electrical spot prices)
Elspot* GetApp() {return g_application;} //Getter for the global application object. Use ::GetApp instead of passing and keeping pointers, in case the application itself is stubbed or mocked outvoid Elspot::init(int /*argc*/, char* /*argv*/[]) //Main entry point for your application. Usually int main(), but this is how Poco does it
{
::SetApp(this); //Set application global singleton
SetNetworking(std::make_shared<Networking>()); //Inject instance of real Networking code. Might be stubbed or mocked later
}
With this setup, you are now ready to make mock tests.
- Category: Security
Even with modern C++, you can easily shoot yourself in the famous foot. Adding static code analysis is a good way of locating some otherwise hard-to-find bugs. Luckily, open-source repositories in GitHub has access to static code analysis tool CodeQL for free, and it even supports C++. There is good documentation available, but here I will explain how to add CodeQL to your C++ project:
First of all, GitHub Advanced Security has to be enabled. (For open-source (public) repositories, it should already be enabled)
To set up the CodeQL workflow, go to the repository Settings, Security&Analysis, click the Code Scanning "Set up"-button (If Code Scanning is not available, make sure GitHub Advanced Security mentioned above is enabled), and finally click CodeQL Analysis "Set up this workflow"-button. This will generate a new file ".github/workflows/codeql-analysis.yml" and open it in online editor.
The default name ("CodeQL") and the "on:"-block can be kept as-is. The "on:"-block will say that analysis should be run on all push to main branch, all pull requests to main branch and at one fixed-random time during week (I got "26 4 * * 3", which means it will run at 04:26 third day of week)
For "jobs: analyze:", name, runs-on and permissions can (must?) be kept as-is. Under "strategy:", make sure language is set to cpp.
And now we are at the actual steps of this workflow. The default workflow wants to check out your git repository, initialize CodeQL, try to autobuild your repository and finally perform the CodeQL analysis. Most likely, this is not enough for your C++ project: You may have dependencies that can be apt-get installed into the Ubuntu image, you may have dependencies that needs to be compiled from source, you may have some specific way of triggering your build and you may have other stuff you do in your build pipeline. Here are how to prepare dependencies and build your project manually:
apt-get install dependencies:
The code scanning image is a bare bone Ubuntu image. Any tools (like git for checking out code, cmake for building or doxygen for generating documentation) or development headers (like libboost-dev) that is in the pre-built Ubuntu repository can be directly installed into the code scanning image with a step like this:
    - name: Install dependencies
      run: sudo apt-get -y install git cmake doxygen libboost-dev
build dependencies from source (or anything else you would do from commandline) :
The code scanning image is pulled clean each time, and destroyed when the scanning is done. Think of it as a brand new computer, where you need to install or build dependencies before you can build your actual project. It is up to you how you want to organize directories and stuff. I usually just put stuff in user home directory (after all, the image is destroyed immediately after running code analysis..). This example step will change directory to user home directory, clone a public git repository, change directory to it, execute its documented steps for build and install, and finally update the system dynamic linker run-time bindings so your project can find it.
    - name: Install Paho C client
      run: cd && git clone https://github.com/eclipse/paho.mqtt.c.git && cd paho.mqtt.c && cmake -Bbuild -H. -DPAHO_ENABLE_TESTING=OFF -DPAHO_BUILD_STATIC=ON -DPAHO_WITH_SSL=ON -DPAHO_HIGH_PERFORMANCE=ON && sudo cmake --build build/ --target install && sudo ldconfig
Manually build your project:
If the provided autobuild step fails, or you want to have full control of the build step, you can add your own build step. Here is a typical Makefile build step
    - name: Compile project
      run: make && make install
Wrapping everything up. A complete example codeql-analysis.yml file (also available for download)
name: "CodeQL"

on:
  push:
    branches: [ main ]
  pull_request:
    # The branches below must be a subset of the branches above
    branches: [ main ]
  schedule:
    - cron: '26 4 * * 3'

jobs:
  analyze:
    name: Analyze
    runs-on: ubuntu-latest
    permissions:
      actions: read
      contents: read
      security-events: write

    strategy:
      fail-fast: false
      matrix:
        language: [ 'cpp' ]


    steps:
      - name: Initialize CodeQL
        uses: github/codeql-action/init@v1
        with:
          languages: ${{ matrix.language }}


      - name: Install dependencies
        run: sudo apt-get install libboost-dev libpoco-dev libwxbase3.0-dev libfmt-dev git cmake doxygen

      - name: Install Paho C client
        run: cd && git clone https://github.com/eclipse/paho.mqtt.c.git && cd paho.mqtt.c && cmake -Bbuild -H. -DPAHO_ENABLE_TESTING=OFF -DPAHO_BUILD_STATIC=ON -DPAHO_WITH_SSL=ON -DPAHO_HIGH_PERFORMANCE=ON && sudo cmake --build build/ --target install && sudo ldconfig

      - name: Install Paho C++ client
        run: cd && git clone https://github.com/eclipse/paho.mqtt.cpp.git && cd paho.mqtt.cpp && cmake -Bbuild -H. -DPAHO_WITH_SSL=ON -DPAHO_BUILD_DOCUMENTATION=TRUE && sudo cmake --build build/ --target install && sudo ldconfig

      - name: Checkout repository
        uses: actions/checkout@v2

      - name: Compile project
        run: make && make install

      - name: Perform CodeQL Analysis
        uses: github/codeql-action/analyze@v1
Finding the CodeQL logs
After having committed the workflow, you will find workflow logs under your Git repository Actions|Workflows|CodeQL. You can also see CodeQL alerts under Git repository Security|Code Scanning Alerts|Code Scanning Alerts|View Alerts.
- Category: Security
Wt is a great modern C++ framework for making standalone web pages. As it does not use Apache, Nginx etc, there is not much information on how to serve the pages over HTTPS. Here is a small guide on how to use Lets Encrypt certificates in your Wt applications:
First, install the Lets Encrypt certbot and fetch your certificates
sudo apt-get -y update &&
sudo apt-get -y install certbot &&
sudo certbot certonly --domain <your domain> --standalone --agree-tos
Also, install OpenSSL development files and generate Diffie-Hellman parameters
sudo apt-get -y install libssl-dev &&
sudo openssl dhparam -out /etc/ssl/dh4096.pem 4096
When building Wt, make sure SSL is enabled (it should be by ON default..)
cmake ../ <other settings> -DENABLE_SSL:BOOL=ON
When starting up your Wt application, use https-listen instead of (or in addition to) http-listen, and reference your certificates
./<application> <other Wt parameters> \
                --servername <your domain> \
                --https-listen 0.0.0.0:443 \
                --ssl-certificate /etc/letsencrypt/live/<your domain>/fullchain.pem \
                --ssl-private-key /etc/letsencrypt/live/<your domain>/privkey.pem \
                --ssl-tmp-dh /etc/ssl/dh4096.pem
If your application is expected to have a long uptime, you may want to put a small script in /etc/letsencrypt/renewal-hooks/deploy/ that restarts it when certbot has successfully renewed a certificate.
- Category: Security
Background
When a user is using a web browser to log in to a web server, the browser remembers enough stuff so the user does not need to log in again when navigating to another page on the same server (by sending Cookies, the Authorization:-header etc for every request). This is very convenient for Bad Guys: they don’t have to hack the web server, hack the machine of the user, phish the user credentials or other difficult tasks - all they have to do is to execute a call in the web browser and hope the user was logged in to his/her bank (or whatever Bad Guys want to access). Doing this is surprisingly simple (send a HTML mail or link to a HTML page that in onLoad submits a form to the exploitable endpoint), and this is the reason for why we have CRSF – Cross-Site Request Forgery.
With CSRF eabled, the server will provide an extra token. This token will have to be kept by the client, and added to all requests that modifies state (POST, PUT, PATCH and DELETE). This is NOT done automatically by the web browser, and because this token is not available to the Bad Guys, their piggy-back attempt will fail. (Sidenote: As the response will not be available to the Bad Guy, requests that do not modify state (GET, HEAD and OPTIONS) are not that important to secure)
Spring with CSRF disabled (Solving the problem The WRONG Way!)
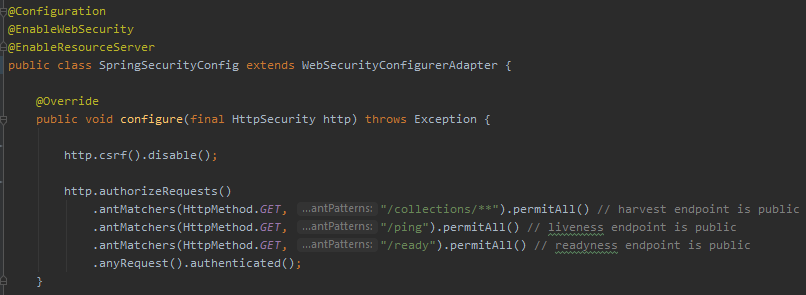
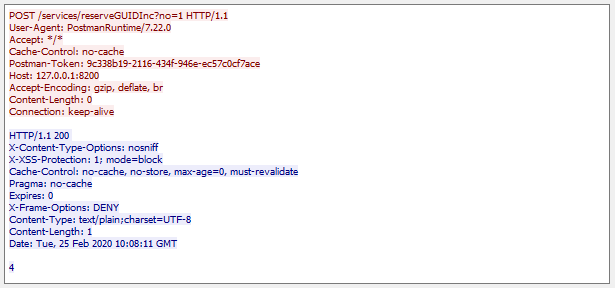
Spring has CSRF enabled by default, but as the inevitable first problem arises, internet is full of advice of just disabling it. Below is a Spring security config calling csrf.disable(), and what a POST request to a service "/services/reserveGUIDInc" looks like over the network (red text is client request, blue text is server response). Disabling CSRF is a simple one-liner, and instead of a pesky 401 the server now gives you requested data (in this example, "4") and a nice HTTP status code of 200 OK. Everything is good, right? Noooooo! Do not disable csrf! If you are authenticated to the server and I send you an evil email, makes you visit an evil web page, or in other ways makes your computer open a web connection to that service, I can piggy-back on your authenticated session and make my evil modification of server state (this is a slightly modified code from a real service, so here it would just imcrement a number. But still, someone uninvited should never be able to make a number increase!)
Keeping CSRF enabled, and still having a working system. (In other words - The Right Way)
Instead of showing a minimal and synthetic example, I will show the configuration of a real-world, in-use, slightly complex system. This is done deliberatly, partly so I as the text author can show some typical gotchas and partly so you as the reader will have to actually understand it and not walk away from here with only partly understanding the problem.
So, what does a real-life Spring configuration look like?
- We typically have the OPTION verb, some endpoints that everyone should be able to call (Swagger URLs, the "Login" and "Forgot Password" endpoints, some legacy endpoints that shouldn't be public but just has to be, etc), and the rest of the endpoints hidden behind an authentication wall. All of this is set up using authorizeRequest()
- There is usually some kind of user authentication (in this example a simple userDetailsService)
- Deciding if Cross-Origin Resource Sharing (CORS) is allowed or not
- What should happen when user logs in, logs out or if something fails spectacularly?
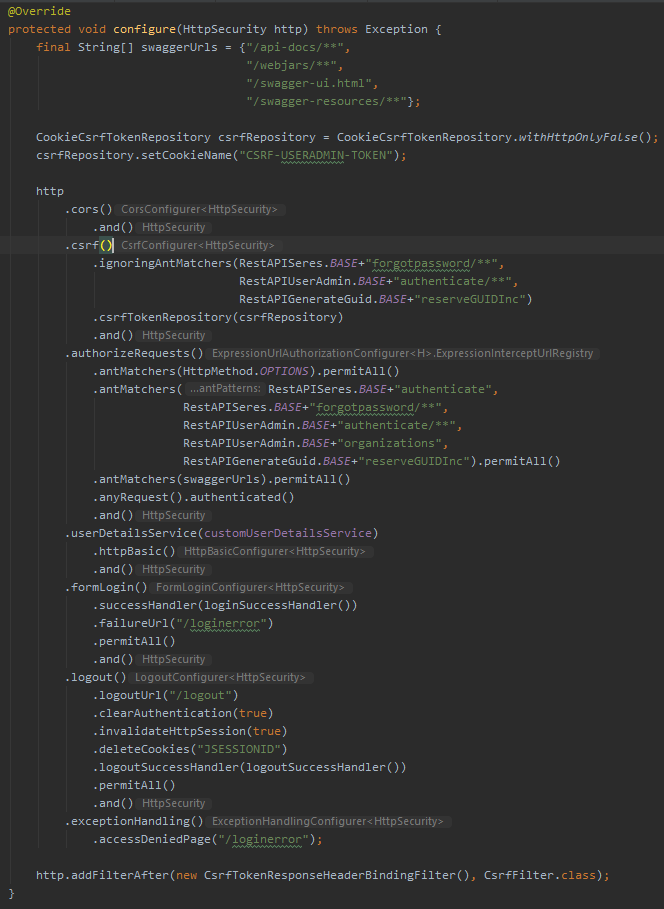
- and last but not least: if CSRF should be enabled (default) or disabled. CSRF by itself does not care if the endpoint is authenticated or not (there are perfectly valid reasons for having CRSF enabled on an unauthenticated endpoint, and although suspicious there might be reasons for having CSRF disabled on authenticated endpoints). However, CSRF needs some way of managing, transporting and verifying the csrf token. Depending on the architecture of the system, there might be multiple services involved, and thus also multiple tokens. In the configuration below, I use Spring CookieCsrfTokenRepository to manage the csrf token as a cookie. As I know there are two services involved in this particular system, I give it a custom and unique cookie name. I also use CsrfTokenResponseHeaderBindingFilter (from a very small and handy third-party library) to add the csrt token to the HTTP response object. This last part is what is often the cause of the whole Spring CSRF problem - Spring works with CSRF out-of-the-box if, and only if, you use Spring to render your pages on the server!
So, with this CSRF-enabled Spring security configuration, what does a HTTP GET look like? As above, red text is client request, blue text is server response. The call is an an authentication request, which is a common first encounter to a system. The client does not provide a CSRF token (the client probably doesn't even have a csrf token by now), but as a GET request by default is not CSRF enabled (GET does not modify state, right), the server happily sends a 200 OK HTTP response including all needed csrf information. I am not sure how often these change (the token is linked to a Spring session which might be reset), but if you for any reason handles these headers yourself, just make it a habit of updating your csrf repository whenever you see a X-CSRF_* header.
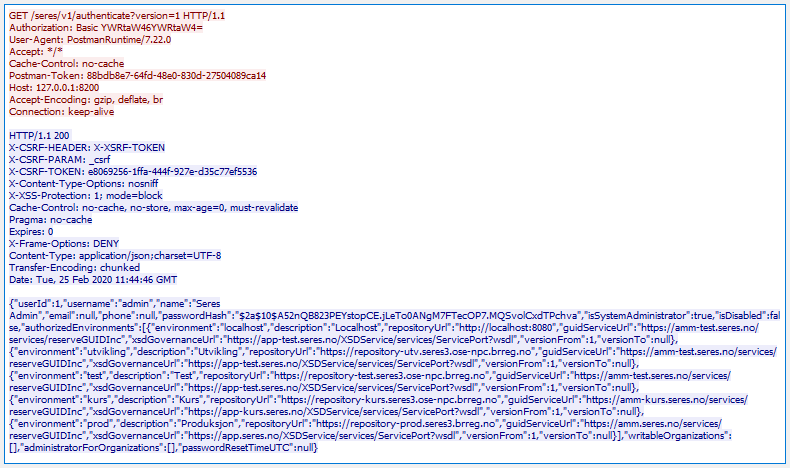
The meaning of these extra headers is quite simple:
- X-CSRF-HEADER tells you what header to add to your request if you send the csrf token as a header
- X-CSRF-PARAM tells you what URL parameter to add if you want to send the csrf token as a URL parameter
- X-CSRF-TOKEN tells you what csrf token value the server has assigned to your session. This is the token value Bad Guy does not have and which he is unable to add to his Evil request
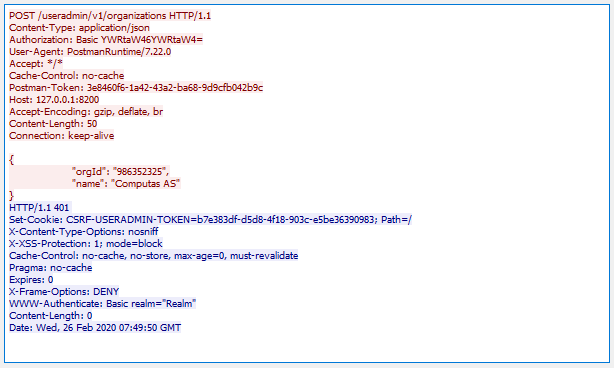
Sending a POST request to a CSRF-enabled endpoint without prividing the expected csrf token is shown below. Note that even if a proper Authorization-header is sent (the very robust username=admin, password=admin), the response is 401 UNAUTHORIZED
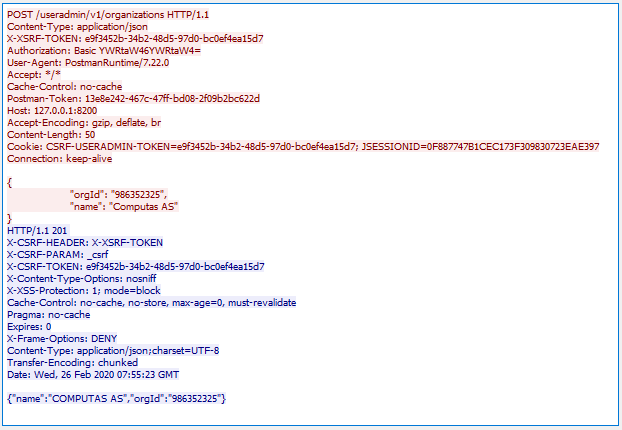
Sending a POST request to a CSRF-enabled endpoint and providing the expected csrf token is shown below. The csrf token and header-name was kept from an earlier call. As you see, the resource is this time successfully created and a 201 CREATED is returned. Also note that the client (in this case, Postman) has cached and provides the CSRF-USERADMIN-TOKEN cookie. Having the csrf token as a cookie is one way of storing it client-side, but the client still have to copy this value over to either the header given in X-CSRF-HEADER or URL parameter given in X-CSRF-PARAM. This is the security of CSRF, the cookie in itself would have been reused by the browser and sent with an Evil request. When testing CSRF from a client with a cookie store, you might want to clear the cookie for each new session you initiates.
Tying the knots (how to get a client talk to CSRF-enabled systems)
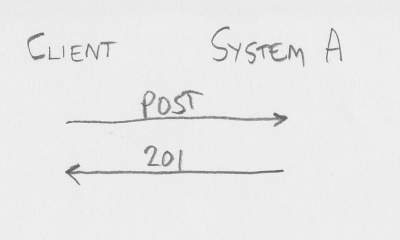
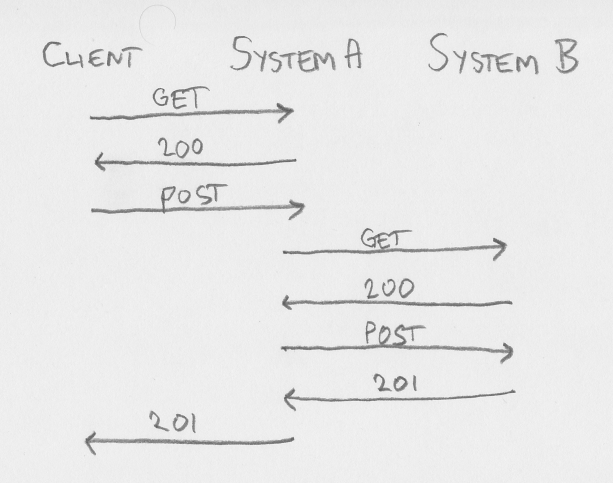
We all agree talking to a CSRF-disabled server is easy. Too easy, actually (as it is even easy for Bad Guy). If client want to POST to a system (let us call it system A), it POSTs to System A - and hopefully get a 201 CREATED back. If part of the creation on System A involves creating something on System B, System A will simply POST to System B and check that it got 201 back, before finally sending the 201 response to client.
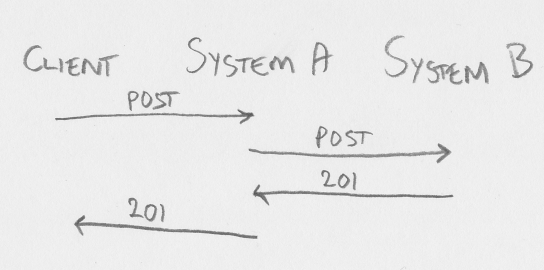
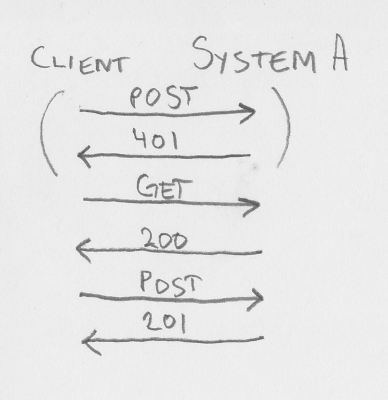
And finally: talking to a CSRF-enabled server. If client is just calling System A as if it was not using CSRF, the server will give a 401 UNAUTHORIZED response. Avoiding this roundtrip is easy, as the client knows if it has a valid csrf token or not. If the client does not have a valid csrf token, it will have to get one. Call authenticate endpoint, call a lightweight liveness/readiness endpoint, call whatever endpoint you want that is either doesn't change state (GET or HEAD) or a modifying state verb (POST, PUT, PATCH or DELETE) that is exempt from the csrf token requirement. The 200 OK response will include information about csrf header name, param name and token value. Store this and use it for the actual state-changing request. If part of the creation on System A involves creating something on System B, System A will have to do the same (send a GET request or similiar to get a csrf token for the session between System A and System B, and then send the actual request).
When client already has the csrf information, client can skip right to the actual request, making sure the csrf token is included in the request, and updating the token information if the response includes updated csrf information.
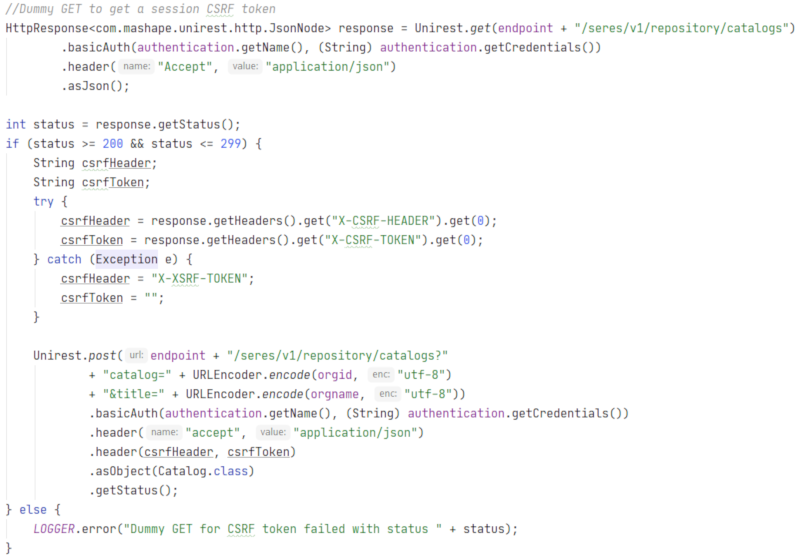
Actual (Java, using Unirest REST library) client code that first calls a cheap GET endpoint for getting a session csrf token and then appends this token to the actual POST call might look something like the code below. The same principles holds for any language and and way you construct your REST calls. And this is how you keep CSRF enabled in Spring and still have clients talk to the server, keeping Bad Guys away.
Also, note that quite a few libraries have native support for CSRF. In NodeJS clients I use axios for REST communication. Its request config by default uses the de facto cookie name 'XSRF-TOKEN' and header name 'X-XSRF-TOKEN' (and these can be changed). If the defaults matches your system, you won't have to do anything at all to have CSRF work in your NodeJS client!
- Category: Security
When setting up email for this site, I followed the Amazon documentation for Exim and it simply did not work. This article describes the few gotchas and how to actually do it.
So, you have created an Amazon EC2 instance in some region, got your domain registered in Route 53, installed Exim (`sudo apt-get install exim4`) and want to be able to send email without them going straight to the spam folders? (Actually, it doesn't have to be EC2 and Route 53, but Amazon has made it easy if you go all in)
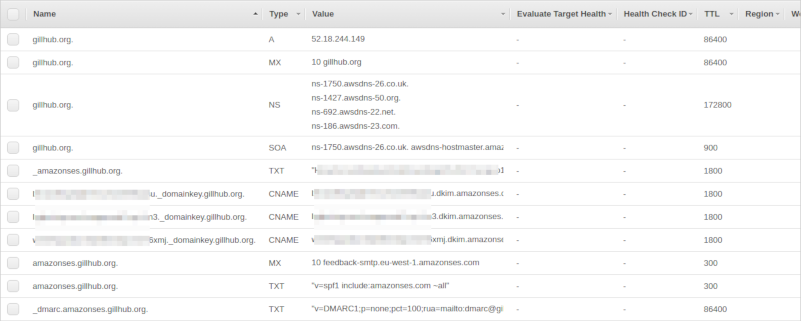
Your Route 53 hosted zone for your domain should look something like this:

To be allowed to send through Amazon SES you need to verify your domain. Make sure you also generate DKIM Settings.
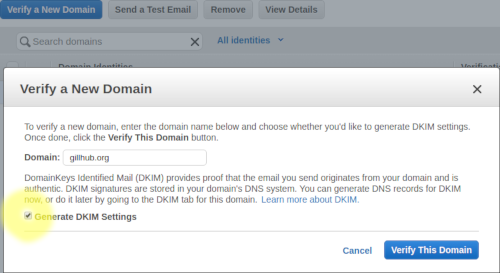
Upload settings to Route 53. Unless you want to make Amazon SES also handle incoming email, go with the default of not uploading the MX record. This is probably a good time to add that MX record manually in Route 53 - I want to handle incoming email myself and added MX "10 gillhub.org". After verifying the domain you should get two emails, one when Amazon has verified the domain and one when Amazon has verified the DKIM settings. After verifying domain and adding the MX record manually the Route 53 hosted zone should look something like this:

In the Amazon SES verified domain entry, make sure to also set the MAIL FROM domain. This must be a subdomain of your domain (I chose amazonses.gillhub.org). Upload settings to Route 53 (including the MX record). Finally I added a very relaxed DMARC DNS record - a TXT record with name _dmarc.amazonses.gillhub.org and value "v=DMARC1;p=none;pct=100;rua=mailto:
The last thing to do in Amazon SES Console is to go to SMTP Settings (in the Email Sending category), take a note of the server name to use and create a set of credentials. The username you give is not important (you will find it in IAM later), but it is very important to take a note of (or even better: download!) the generated credentials. You will need them for the Exim4 config, and this is the only time it is available. If you lose them, you can create new set of credentials, though.
The Amazon Console part should now be complete. Time to SSH into your instance and set up Exim4.
In your SSH shell:
`sudo dpkg-reconfigure exim4-config`
Type = Sent By Smarthost, Received Via SMTP
Mail Name=What you put in your top-level MX record. gillhub.org for me
IP-address for listeining=blank
Final destinations=Guess it could be blank, but I put in my MX record (gillhub.org) there too
Machines to relay for=blank
Hostname of smarthost=What was listed as servername in SMTP settings, two semicolons and port 587 (for me: email-smtp.eu-west-1.amazonaws.com::587)
Hide Local Mail=yes (will probably work fine with No, too)
Visible Domain=Your MX record (gillhub.org for me)
(Use default values for the rest)
The next step is what caused problems for me. The Amazon SES Documentation for Exim Integration says you should replace Exim LOGIN-handler. Following the documentation result in Exim failing to send email with a "530 Authentication Required". For me, sticking to the preferred Exim4 way of authenticating worked much better:
`sudo nano /etc/exim4/passwd.client` (replace nano with your favourite editor)
Add a line in the given format "server:login:password", where server is "*.amazonaws.com" and login:password is the generated SMTP credentials above.
For overriding hostname for MAIL FROM domain, I created the file /etc/exim4/conf.d/main/99_exim4-config_gillhub and set primary_hostname in it:
`sudo nano /etc/exim4/conf.d/main/99_exim4-config_gillhub`
Also, add an alias for the email address given in the _dmarc DNS record. I make dmarc be an alias for admin, but do whatever you want.
`sudo nano /etx/aliases`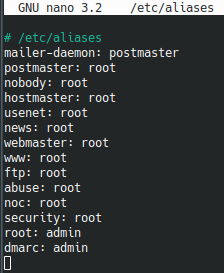
Now it should just be a matter of updating the Exim4 config file..
`sudo update-exim4.conf.template -r`
..and use your favourite way of restarting Exim4
`sudo /etc/init.d/exim4 restart`
To verify that DKIM is working, send yourself an email (obviously replacing my email address with your own!)
`exim -v
(Just type in whatever you want in the mail body, and send it by either having a dot on a line of its own or pressing ctrl+d)
If everything works as expected, you should see Exim handing over the message to Amazon SES, where it will have DKIM headers appended and sent to your email address. There, it should end up in your Inbox and not Spam folder. If you view the mail headers, you should see at least one (most likely two) "DKIM-Signature" headers.